Web Frontend HOWTO
The Autotest web frontend can be used for
- browsing existing jobs
- viewing job details and getting to job results and log files
- submitting new jobs
- tracking hosts’ statuses
- managing (browsing, creating, modifying, and deleting) hosts, labels, profilers, and ACL groups
When you first bring up the frontend, you’ll see something like this:
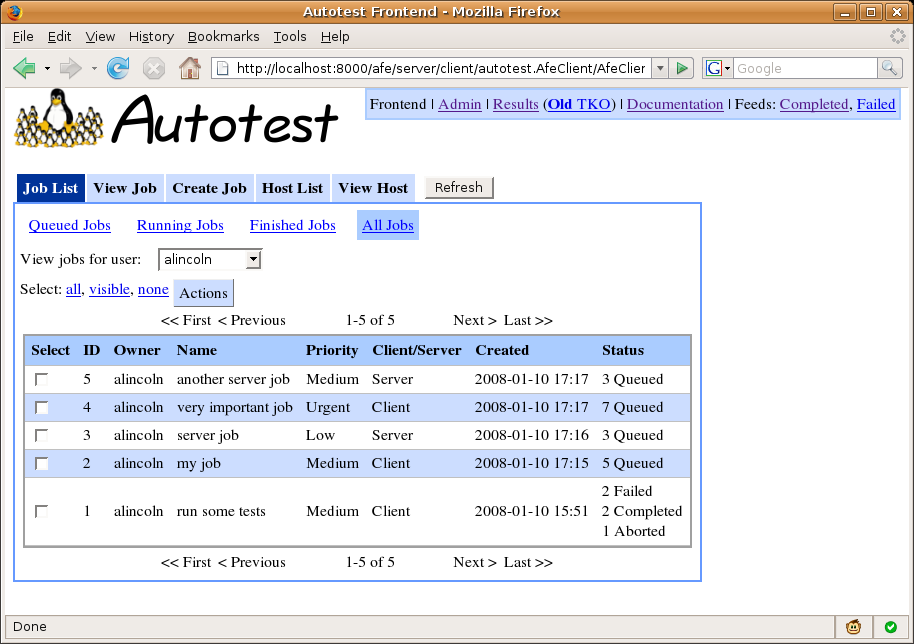
Job List
The interface initially shows the Job List tab, which allows you to browse existing jobs. The four links at the top filter jobs by status - you can view only queued, running, or finished (which includes completed and aborted) jobs, or view them all (the default). You can also filter by job owner and job name. The initial view shows all jobs owned by you. Most recently submitted jobs are displayed first.
The Hosts column shows how many hosts in each job are currently in each state (see JobAndHostStatuses). You can use the Refresh button at the top to refresh the list (it won’t refresh itself). Clicking on a job in the list brings up the View Job tab for the selected job.
You can select multiple jobs with the checkboxes on the left, or using the links at the top of the table. You can then using the “Actions” menu to operate on many jobs at once. Currently, this only allows you to abort jobs.
View Job
The View Job tab shows details about a single job along with results and a link to log files.
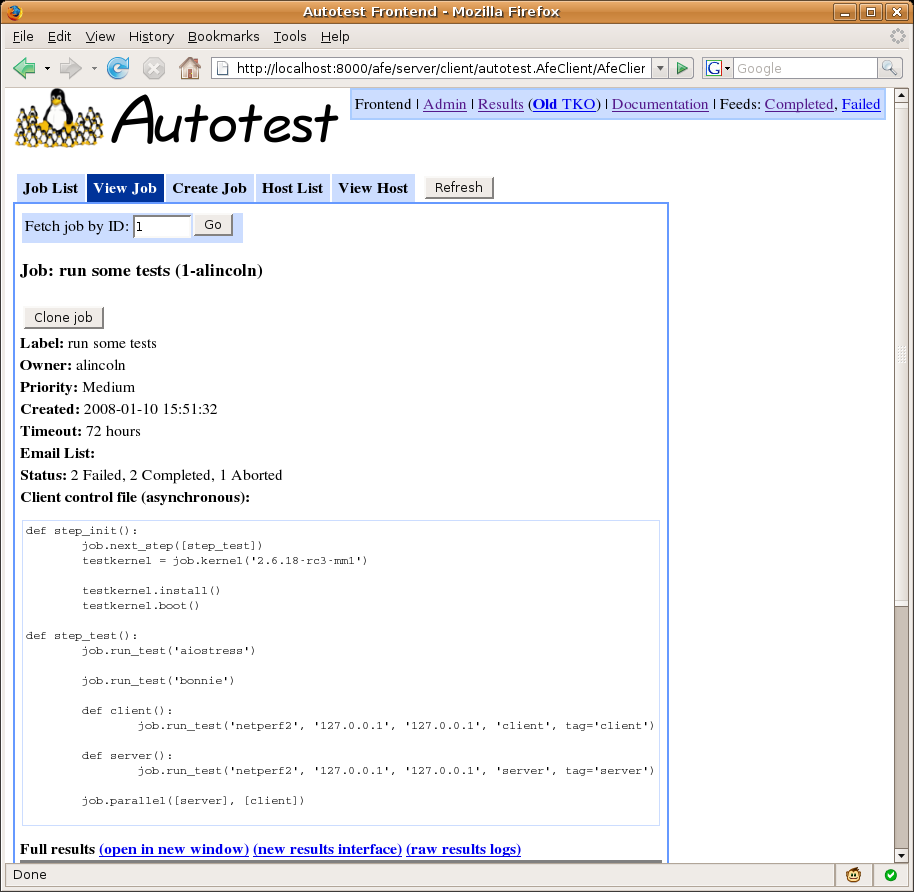
The box at the top allows you to manually fetch a job by ID. The page displays basic info about the job, an “Abort Job” button if the job has not completed, and a “Clone Job” button to create a new job modeled after the current job. Clone job will present three options:
- Reuse any similar hosts - if the original job use “run on any” hosts, the new job will do the same, so that it could get assigned different hosts.
- Reuse same specific hosts - the exact same set of hosts will be used, even if the original job specific “run on any” hosts.
- Use failed and aborted hosts - uses the hosts have have been aborted, or have failed the job in some way
Below this, the full contents of the job’s control file are displayed, follow by job results. This consists of an embedded TKO spreadsheet for the job with three links above:
- open in new window - to open the old TKO interface for the job.
- new results interface - to open the new TKO interface for the job.
- raw results logs - to bring up a listing of the job results directory. This is often useful for debugging when things go wrong.
Finally, the table at the bottom shows all hosts on which the job was scheduled and the current status of the job on each host (see JobAndHostStatuses). Links are provided to jump directly to the status log and debug logs for each host. In addition, you can select individual hosts and abort them with the Actions menu. You can clone the job on the selected hosts from the Actions menu as well. Selecting no hosts and choosing “Clone job on selected hosts” will clone the job without adding any hosts.
Create Job
This tab allows you to create and submit a new job.

Create job parameters
- Job name can be any string.
- Priority affects how your job will be placed in the queue; higher priority jobs with preempt lower priority ones that have not yet started when the jobs are scheduled on the same machine.
- The kernel field allows you to specify a kernel to install on the test machine before testing; leaving this field blank will leave out the kernel install step. You can specify a URL pointing to a kernel source tarball or a .rpm or .deb package. Site-specific extensions are also possible.
- Timeout specifies the hours after job creation until the scheduler will automatically abort the job if it hasn’t yet completed.
- Max runtime specifies the hours after the job starts running (Autoserv is executed) until the scheduler will automatically abort the job if it hasn’t yet completed.
- Email List can contain a comma- or space-separated list of email addresses which will be notified upon job completion.
- If Skip verify is checked, hosts won’t be verified before the job is run. This is useful for machine reinstalls among other things.
- Reboot before determines whether hosts will be rebooted before the job runs. If dirty means the host will be rebooted if it hasn’t been rebooted since being added, being locked, or having the last job run.
- Reboot after determines whether hosts will be rebooted after the job runs. If all tests passed means the host won’t be rebooted if any test within the job failed.
- If Include failed repair results is checked, when a machine fails repair, “repair” and “verify” test entries will show up in TKO for that machine, along with a SERVER_JOB entry. If unchecked, nothing at all will show up in TKO for the failed machine.
- The Tests section contains a table allowing you to select a set of client- or server-side tests to run. You can click on any test to view its description. Your test selections, along with the kernel field, are used to build the job’s control file.
- Profilers shows available profilers than can be enabled for your job.
- Clicking View control file will display a box that shows the
control file being constructed from your choices. You may edit the
control file by hand by clicking Edit control file. This will
make the control file field editable, but disables the kernel input
and all test selector. If you want to go back and change your
selections in these inputs, you’ll need to revert your kernel
changes. When editing a control file, you have two additional
options. You shouldn’t have to edit these unless you know what you’re
doing.
- Client or Server - whether the control file should run on the client-side or the server-side.
- Synchronous - if checked, the job will wait for all machines to be ready and then run all machines in a single autoserv instance. This is usually only necessary for multi-machine tests.
- The Available hosts and Selected hosts tables allow you to
select hosts on which to run the job. Individual hosts can be
selected and deselected by clicking on them. The filters at the top
of the Available hosts table can be used to narrow your selection,
just like in the Hosts tab. “Select visible” adds all hosts currently
visible in the Available hosts table. “Select all” adds all hosts
currently matching the filters.
- The Run on any box allows you to request that the job be run on any machines from a given platform or label. The machines will be automatically selected from the set of available machines when the job is run.
- The One-time host(s) box allows you to enter a hostname (or space-separated list of hostnames) that will be added to the database just for the job, without leaving the machine available for other jobs.
- Finally, the Submit Job button will attempt to submit your job, and any errors will show up in red.
Host List
This tab allows you to browse all hosts in the system.
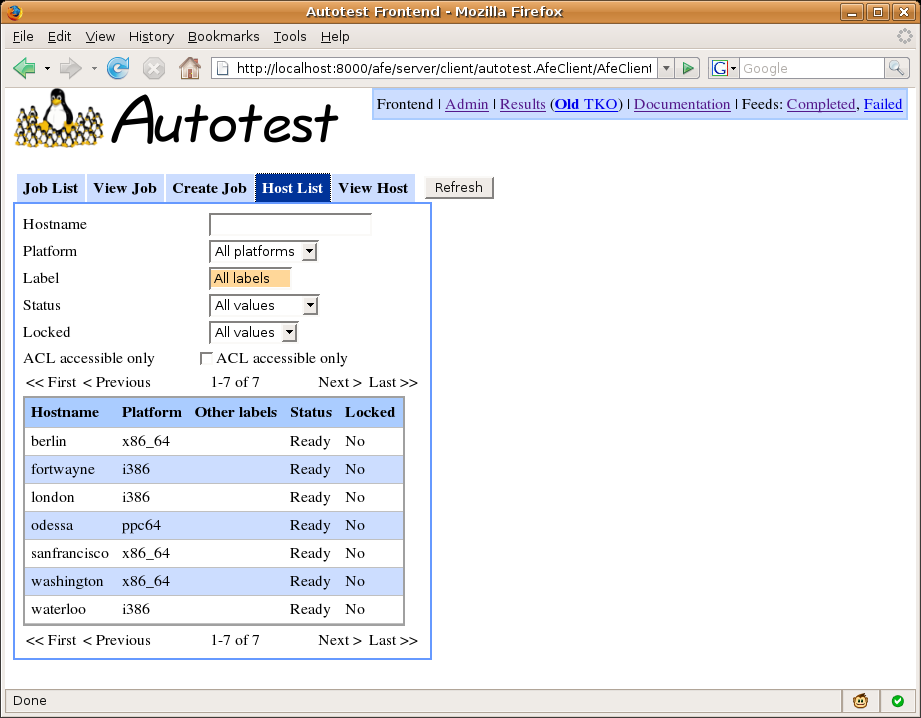
The table can be searched and filtered using the boxes at the top. Clicking on a host brings you to the “View Host” tab for that host.
Additionally, you can force hosts to go into Verify by selecting them and choosing “Reverify hosts” from the Actions menu.
View Host
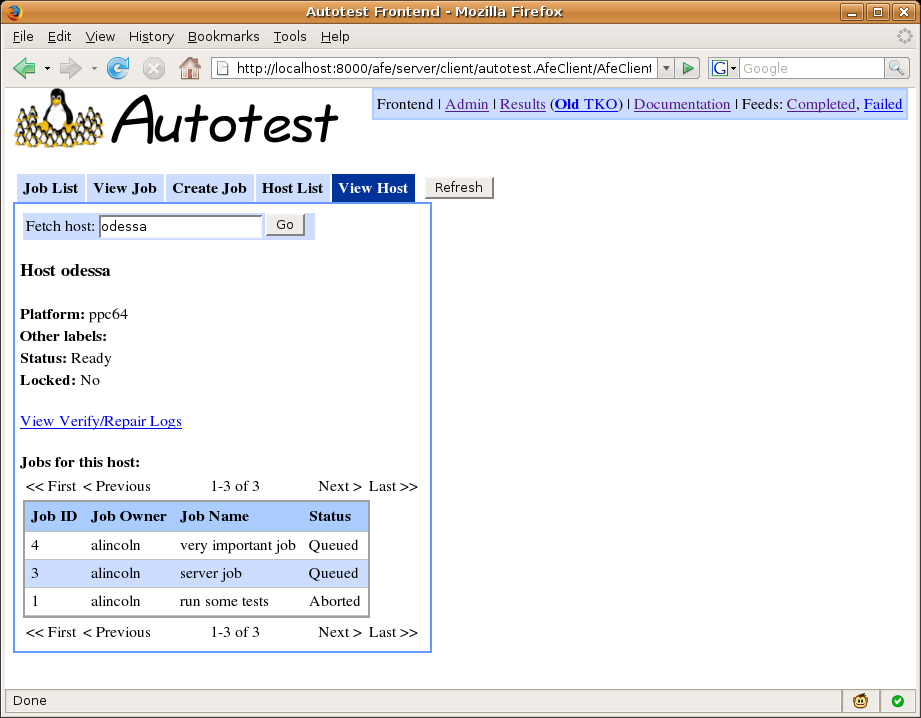
This tab shows detailed information for a particular host including a list of all jobs queued, running and previously run on that host. It additionally provides a link to the scheduler’s verify/repair logs for the host.
User preferences
The user preferences tab allows you to set defaults for creating jobs. See WebFrontendHowTo#Createjobparameters.
- Reboot before and Reboot after control default values for the corresponding options on the Create Job page.
- Show experimental tests will make the Create Job page show tests that are marked as “experimental” in the control file.
Admin interface
Clicking the “Admin” link in the upper right corner takes you to the
admin interface for managing hosts, labels, profilers and ACL groups.
Tests may be managed through the admin interface as well, but the
preferred server setup is to use utils/test_importer.py to
automatically populate the DB with information from the test control
files themselves (see ControlRequirements
and utils/test_importer.py --help).
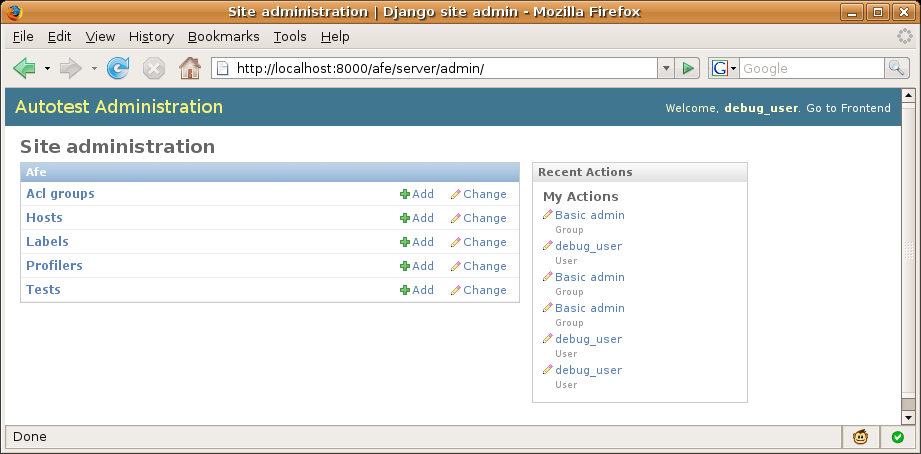
This is the built-in Django admin system. Here you can browse, create, modify, and delete objects. The link in the upper right corner takes you back to the frontend. The different objects types appear on the Admin index page. Clicking on any object type takes you to a list of that object type.
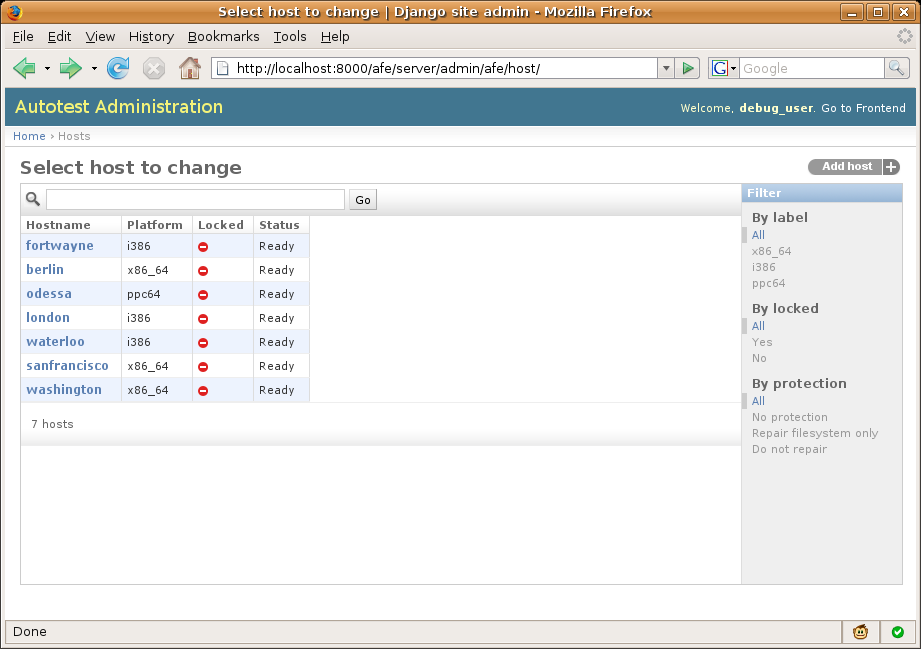
The list can be sorted, searched, and filtered. The link at the top right allows you to create a new object, and clicking on any object takes you to the edit page for that object.
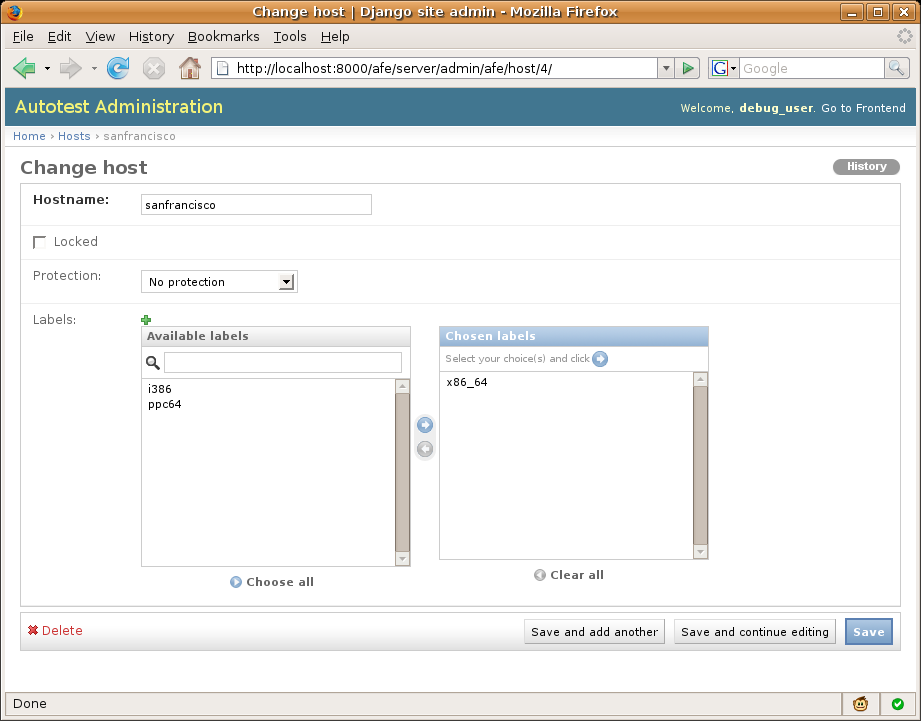
From this page you can fill in the information in the fields and click “Save” at the lower right corner to add or edit the object. You can also delete the object using the link at the lower left corner.
For help on the meanings of different fields, see the database documentation.